This is the final third part of my short series on creating Title Template for FCP (Pat 1 and Part 2), but not the last of my articles on Motion Templates. In the coming articles, I will tell you how to make an FCP Transition in the Shaft (2000) style. We will also make an FCP grading Effect that reproduces the Gradient map color correction in Photoshop. For some reason, this method is very popular and I decided - why not reproduce it for FCP?
So finally - Rigging the Title Template. The procedure for integrating a Motion project for use in FCP is called "Rigging and Publishing". The second part, Publishing, is almost done. Our title can be easily and variable customization in FCP. But we have published ready-made parameters and controls. If Motion parameters and controls are not enough, Rigging comes to the rescue.
But what is Rig itself? I did a bit of research and found that — Rig, like Keyframe, came to CGI and Motion graphics from analogue traditional animation. And if Keyframes are a fairly recent method, then Rigging is at the core of animation, the oldest of its kind. I'm talking about Puppet shows.

Photo by pixpoetry on Unsplash
The animator holds a crosspiece in his hands, from which string stretch to the parts of the puppet. Raising or lowering the end of the crosspiece - the animator strains or weakens the string, the puppet is animating. The Rig is a crosspiece controller.
We will combine multiple controllers in one Rig. Instead of string in Motion, we use Widgets. The manipulation range will be set by Snapshots (parameter states).
Parameters in Motion are driven by three controllers (again this is the magic number three) - using a Slider, a Pop-Up menu, and a Checkbox.
Eye Candy style is very expressive. But what if we need a good old solid background for our Title Template? Let's create it and use the Checkbox to activate or hide the solid background option. Eye candy background style will be the default.
But before that, we need to make some changes to the structure of our project in order to prepare it for rigging.
1. Let's create a new group, let's call it BG. Place in a new group the source of the mask image - an animated rectangle shape layer.
2. Activate the Rectangle shape layer and deactivate the BG group.
3. Clone the BG group.
Now the background of our title is a clone of the group with a shape, the Eye Candy layers are hidden under a color solid background.
Let's add a Rig to the project. This can also be done in three ways: from the main Toolbar, in the add object Pop-Up menu, using the menu Object/New Rig, or by keyboard shortcut ⌃⌘R. The Rig icon represents a joystick pictogram.
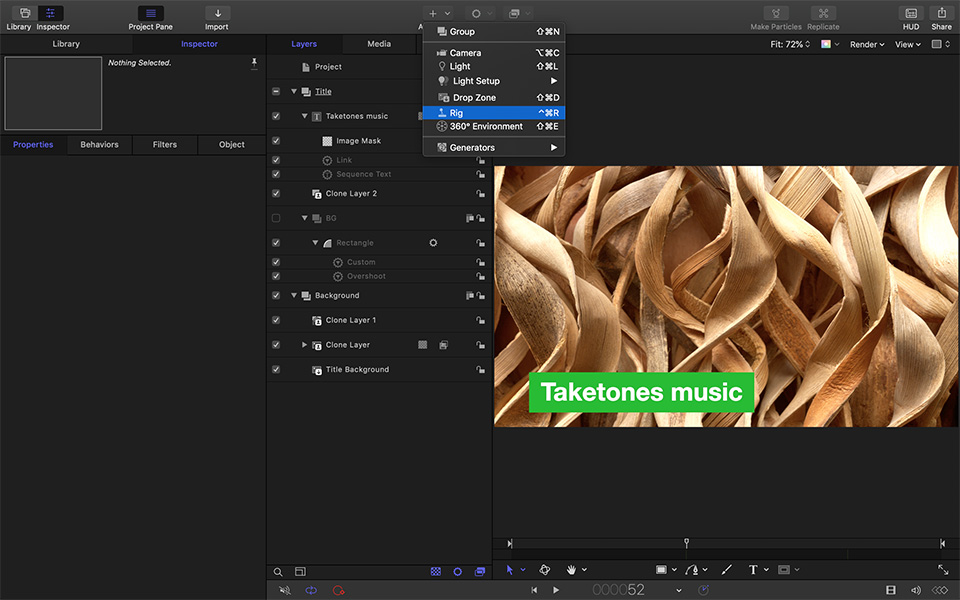
The Rig itself, without "string", is useless. By adding a Rig to the project, we can also include any of three controllers — Widgets. In the Rig's Inspector Object tab, you can select any of three Widgets - a method we will manage the parameters. As I suggested earlier - we need a Checkbox Widget.

We have created a controller, now we need to stretch and fasten the string to it.
The easiest thing to do is to assign by drag and drop the opacity of the BG group clone and the two clones layers creating the Eye Candy effect to the Widget. For convenience, these last (Eye Candy) two clone layers can also be grouped. In this case, we assign by drag and drop the opacity parameters of the clone of the BG group and the Eye Candy group to the Widget.
Let's assign Snapshots. In the Object tab of Widget's Inspector, when the Widget Checkbox is inactive, set the BG transparency parameter to zero.
Activate the Checkbox and set the Eye Candy group parameter to zero.
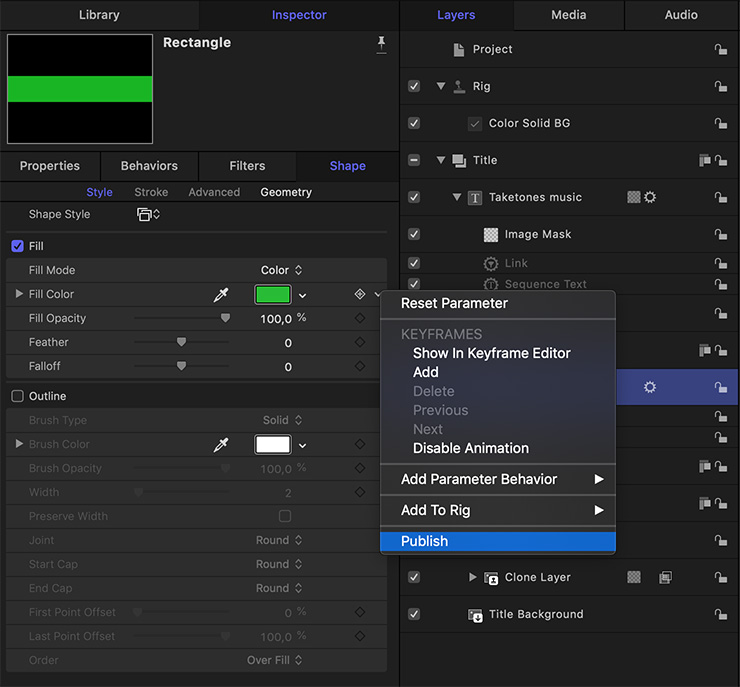
Activate and deactivate the checkbox - our Widget is functioning successfully, snapshots are set correctly. For convenience, we will rename the widget layer and do not forget to publish it so that it is available in FCP.
For complete convenience, publish the Fill Color parameter of the Rectangle object. Now it is possible to change the color of the solid fill.
This is just one way to add a solid background option to our Title Template. You can diversify this project with the gradient background option. But, as I wrote in one of the previous articles, it is very important to stop in time;)
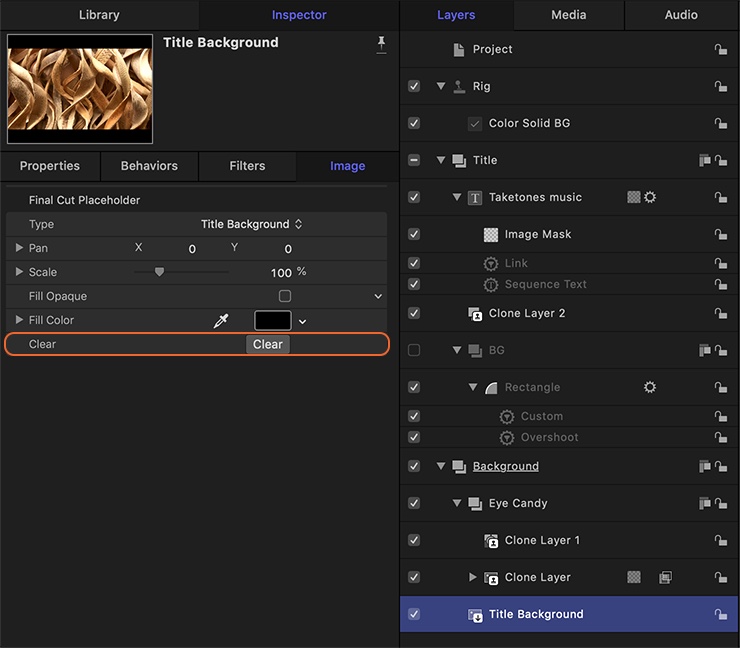
Let's complete the project - clear the Title Background placeholder from the temporary image.
Let's check how everything works in FCP.
That's it - the Title Template is done. You can download the result here.
You rightly have a question - what to do with other widgets (Pop-Up menu, Slider)? We will talk about them in more detail in the following articles. This is the final article on the FCP Title, but not the last article on FCP Templates. We will continue to explore Rigging in Apple Motion. Stay tuned.