So, when all the changes are made, the work on the composition is finished, we prepare it for output. Let's run the menu command Composition - Render Queue.

First, let's define the file name and location. Initially, Adobe After Effects assigns a song name to the file, but we can change the settings so that the file name consists of the song name and the project, or the song name and the resolution of the future video. This is very useful if you have several songs to output.
This is why the tab is called the "render queue". You can queue several songs, set their settings for each, and they will be rendered one after another. To add a song to the queue, run the Composition->Add to Render Queue menu command. Next to the Output To field, there is a triangle button, by clicking it you can set the parameters for naming the output file.

The name of the file is next to it. Clicking on it brings up a window where you can enter a new name and specify the folder to place the video file in.
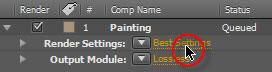
Before creating a separate file, the program renders the composition. Parameters of visualization are set in the Render Settings window. It opens when you click on the name of the visualization parameters template.
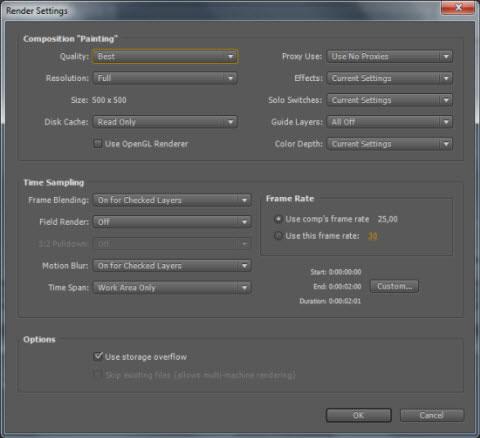
The first thing we are asked to do is to choose the parameters of the composition. The parameters specified here take precedence over the ones we specified when we created the composition. Let's have a look at them.

Here you can specify Quality, Resolution, Proxy Use, Effects, or Slot Switches. If you don't understand some of the settings, leave them unchanged. With experience, you will be able to understand all the settings. You can set each parameter to Current Settings. This will use the song parameters. The next block of settings is Time sampling. This is where you specify the parameters that affect the length of the video.
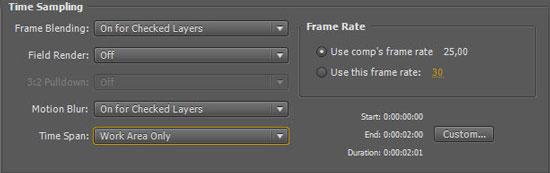
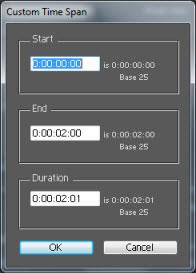
For example, the TimeSpan parameter specifies whether to use the Length of Comp or the Work Area only. Or you can specify the entry and exit points by selecting Custom. In the window that appears, specify the desired time interval.
Having specified the necessary parameters, close the window by clicking the OK button. If you know that you will use these settings quite often, you can save them to a template. Click the triangle button next to the name of the current template of visualization settings and select Make Template.

In the window that appears, specify the name of the template and after clicking OK, the new template will be available for selection from the list.
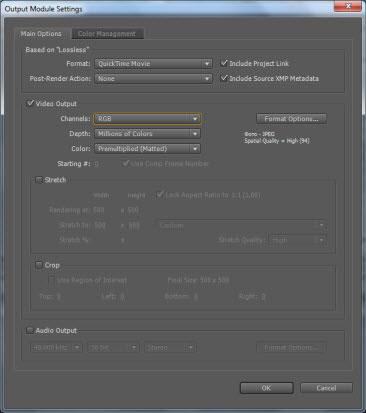
There is one last block of parameters - Output Module. This specifies which compression parameters will be applied to the video file and whether they will be applied at all.

You must know exactly for what purpose you are creating the video file, and then specify the compression parameters. If you have not decided the purpose of the video codec yet, you may not use it. The first thing you should choose is the video format. Choose QuickTime Movie. In the Post-Render Action field you can specify Import, then after the output file will be placed in the project.
Next, we need to configure the parameters of the selected format. In the second block, click the Format Options button. A window with format options opens.

Select the MPEG-4 video compression type. The other settings can be left unchanged.
Click OK.
Next are the color settings. These ones we will leave unchanged too.

If you check the Stretch box, the Stretch options block will become available. That is, you can increase the size of the frame. Of course, it is better not to do this, because it will affect the quality of the image.

The next block of options is Crop. Check the checkbox to activate the block, and specify how many pixels to remove from each edge.

And the last block is Audio Output. If you used audio layers in the project, check the box and select the audio output parameters.

Close the Output Module Settings window by clicking “OK”. The name of the template has changed to Based on "Lossless". You can save this template under a new name, as in the case with the Render Settings.
When all the settings are made, press the Render button. This starts the process of outputting the song to the file.

After completing this process, you can open the folder with the file and watch your video. To find the folder easily, click on the turntable to the left of the Output Module and click on the link.

The video is ready. But you can always go back to the project and change something about it.
Congratulations! Now you are ready to learn lessons and improve your abilities in After Effects. We wish you creative success!