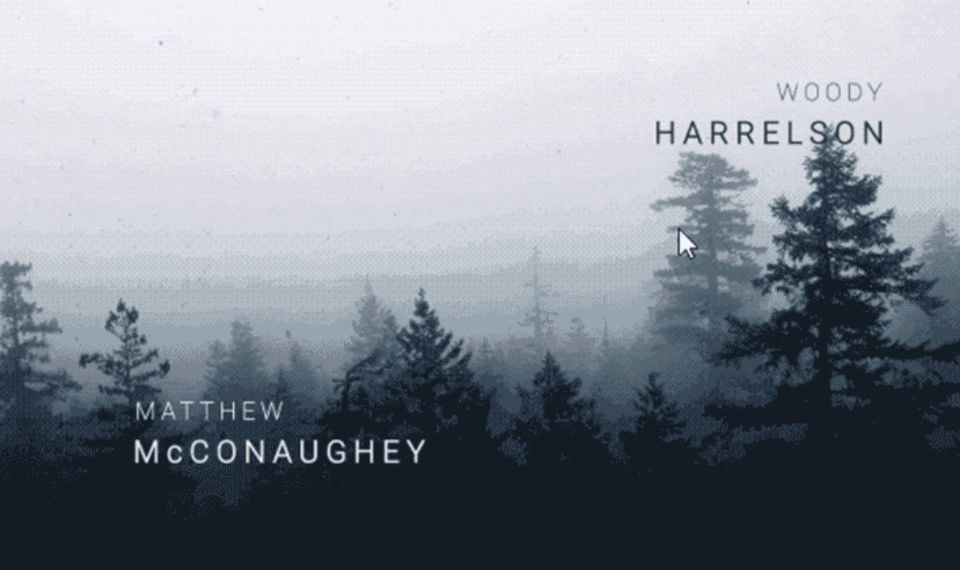
We recreate the most famous credits of the series "True Detective" and repeat the main tricks.
The credits of the True Detective series made a furor as soon as they had appeared and they are now a part of the best film selections of recent years. They are built on the principle of double exposition - overlapping backgrounds shown through the figures of the characters - creating mood and setting intrigue. Despite their seeming complexity, these effects can be realized with standard After Effects tools. How? We will tell you!
What's coming up in this lesson
We'll look at how the True Detective title animation works, and try to recreate it in After Effects without the need for third-party plug-ins. Here's what we'll end up with:
-
● Step 1: Preparing the workspace and sources
-
● Step 2: Animation of the flight over the forest
-
● Step 3: Creating a multi-exposure
-
● Step 4: Connecting video sequences
-
● Step 5: Adding artifacts
Step 1: Preparing to work
1.1 Creating a project and a new composition
Open After Effects and create a new project: File → New → New Project.

After creating a project, you have to create a composition in it by selecting New Composition.

Creating a new composition.
In the composition settings window, specify the settings as shown below. Set the frame rate to 25 and the duration to 20 seconds. Name the composition Title.

The composition settings window.
1.2 Selecting the sources
First, you need to select the source videos that make up the project and which will form the basis of the animation. You will need a total of four pieces of footage:
-
● Beautiful atmospheric scenery - preferably a little gloomy, corresponding to the mood of the film;
-
● Human footage - preferably with a monochrome background;
-
● Footage of industrial buildings;
-
● Video with dust or scratches to give the titles a finished look.
Only two resources are used to find the necessary sources - YouTube or footage stock. The choice fell on videos like these:

A mystical landscape with a forest.

The industrial appearance of the enterprise.

Footage of a man on a white background.
1.3 Importing the sources
To import your chosen footage, go into After Effects, right-click in the Project pane, and select New Folder on the menu that appears to create a new folder. Name it Source.

Creating a new folder.
Transfer the sources to the Source folder. Just select them in Explorer and drag and drop them to the folder.

Importing the sources into the project window.
Give the files meaningful names, so that later it was convenient to work with them.
1.4 Create two compositions for the two parts of the titles
It is very important to quickly navigate the project and not to get mixed up in the layers. Therefore, the two fragments of titles create two compositions - one for the first part, where there will be a forest (call it Forest), and another one for the second part - in which we will work with the human video and industrial landscape (call it Mask).
To create a new composition, click the Create a new Composition icon at the bottom of the Project panel. Leave the composition settings at their defaults.
Icon for creating a new composition in a project.

It should go like this:
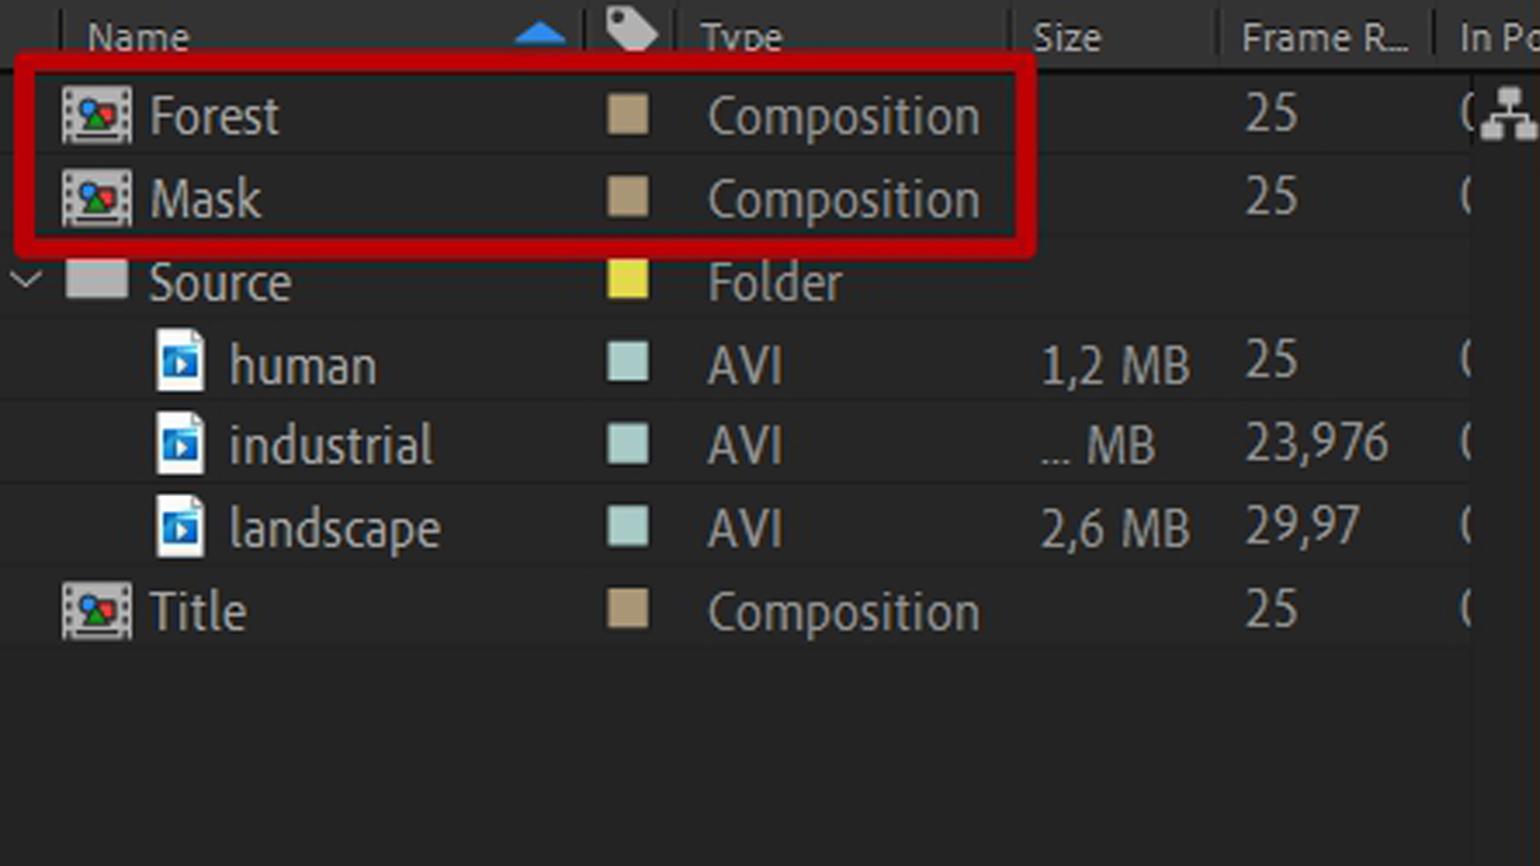
The two created compositions in the Project window panel.
Step 2: Work with the composition of the Forest
2.1 Preparation of the composition
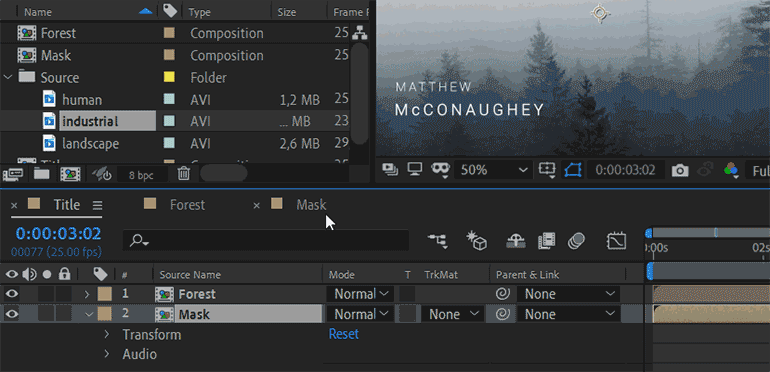
Move the Forest composition to the Title layer panel of the main composition.

The Forest composition on the Layers panel.
2.2 Add video
Now you need to add the forest video (landscape) from the Source folder to the Forest composition. Double-click to open the Forest composition (you can also do it by clicking the tab at the top of the Layers panel) and move the forest video there as shown on the screenshot:

2.3 Add text layers
Above the layer with the video of the forest, place the text layers with the names of the characters of the series.

Or select New → Text in the context menu of the Layers panel.
Let's start with the name of the actor Woody Harrelson. Click the "T" icon in the toolbar to create the first text layer for the name Woody. Set the text to the following parameters:

Take the color for the text with a dropper from the darkest Christmas tree. Place the layer in the upper right corner - you don't need to align it in any way yet.
Then create a text layer for Harrelson in the same way, change the text size to 37 px and the headset to Roboto Light.
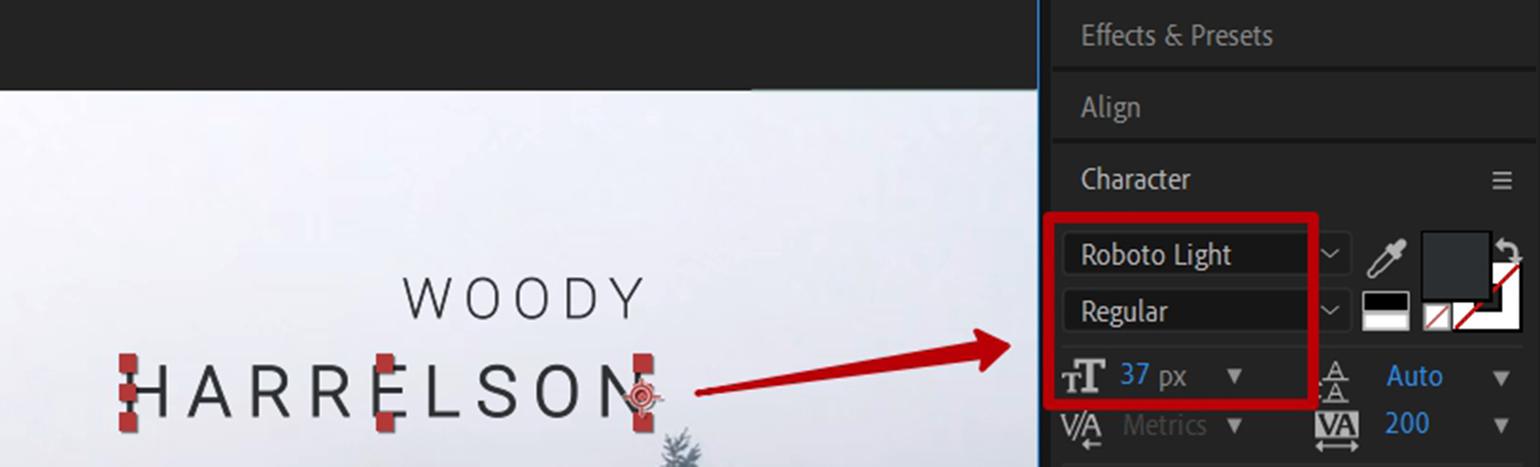
Position the Harrelson text box below the Woody box and align it to the right edge by clicking the appropriate alignment icon in the Align panel above the text properties panel.

Similarly, create layers for the name of the actor Matthew McConaughey, place them in the bottom left corner, aligned to the left edge. The color of the text is white.
The final composition should look something like this:

2.4 Testing the composition
Press the spacebar, run the song preview, and make sure everything works.

Everything is as intended: the forest is moving towards us, but the text is still fixed in its allotted places. To create a moving text effect, we'll use the Scale property. But before we start, let's set the timing of the composition - a too-long video breaks the idea of the titles and weakens the viewer's attention.
2.5 Decrease the timing of the composition
Now the video is 12 seconds long, while the composition was created for 20 seconds, although in general, it is enough and six.
The composition timing can be reduced in two ways. The first is to select the "Composition Settings" item in the context menu of the Layers panel. The "Composition Settings" window will appear, and in the "Duration" field you set the desired time.

The second is using the timeline in the Timeline panel. At the bottom of the Timeline panel, move the slider to the end of the composition, select the blue marker at the top and move it to the area around 6 seconds. Then right-click on the timeline area and choose Trim Comp to Work Area.

Now the length of the composition is six seconds - perfect for this project.
2.6 Create a text motion effect
To create a text movement effect, select the standard layer property - Scale. Select all the text layers and press the "S" key on your keyboard to select the Scale property of all the selected layers.

To set the layer properties manually, you need to click on the down arrow to the left of the layer name and go to "Transform". But when we're changing the properties of several layers, in this tutorial we'll use hotkeys.
Go to the Timeline panel, check the blue checkbox - the current-time indicator for 15 seconds and click the stopwatch icon next to the Scale property to set the initial keyframes of the animation.

In the same way, set the keyframes to 5 seconds - 23 frames, only this time change the value of the Scale property from 100% to 80%.

2.7 Testing the composition
Press the spacebar and see what has changed.

Everything works, and the approximation shows it well.
Once again check the composition: alignment of the text, marginal indentation, overall appearance - the basic work with this composition is complete.
Step 3: Working with the Mask composition
3.1 Preparation of the composition
Go to the Title track and move the Mask track there.

3.2 Adding video
Then click on the Mask song and add the two video files from the Source folder - human and industrial - to it.
3.3. Create a mask from the human layer
The next step is to make a mask out of the guy - you only need a silhouette from him to make the video show up inside that outline. Right-click on the human layer, choose Mask → New Mask from the context menu, or use the Ctrl+Shift+N shortcut.

If nothing has changed externally, open the layer properties and make sure that the mask is active.

It's okay, the mask is in place.
If the video in the composition has sound, it is better to disable it at this stage, otherwise after rendering when viewing the final result you will have an unpleasant surprise - the royalty free music will have to search manually, disable and re-render.
To mute a layer, just click on the volume icon to the left of its name.

Select Luma Inverted Matte "human" from the drop-down menu in the TrkMat (Track Matte) column.

Evaluate the result.

We got this interesting effect of a transparent person with a superimposed video that stays within the contour of the human layer.
3.4 Removing unnecessary details of the mask
Now you need to process the mask - get rid of unnecessary details so that only the contour remains.
It's pretty simple: find the Effects & Presets panel, type Curves in the search box, and drag this preset onto the human layer.

It will automatically open in place of the Project window - adjust the curve as shown below:

The filling of the mask has become more contrasting, unnecessary details have disappeared: lips, chin, facial outline, and forehead contour - now the contour looks more coherent. The next step is to refine the industrial layer by tinting it in a cool shade and working with different effects to get the desired picture.
3.5 Finalizing the filling of the mask
Find the "Black & White" preset in the Effects & Presets panel and drag it onto the industrial layer. Set the values as shown in the screenshot and see how the picture changes in real-time:

Now find the Cartoon effect, move it to the layer, and experiment with the settings highlighted in the screenshot:

If the settings are well chosen, the image will lose the fine details, and the picture will be a little softer.
Keep in mind that the Cartoon effect consumes a lot of computer power, so it is better to turn it off when testing videos.
Now you need to slightly dull the fill of the mask, for this we use the adjustment layer.
3.6. Adjusting the background contrast
Right-click in the Layers panel and choose New → Adjustment Layer from the context menu.

Apply Curves preset from the Effects & Presets panel to this layer and adjust it like this:

3.7. Tinting the background
Create a new fill layer: right-click in the Layers panel and choose New → Solid.

In the settings of the new layer, set the fill color #859CAB. Apply Curves preset from the Effects & Presets panel with the following curve settings to the resulting layer:

Also in the layer settings, you can set the Multiply blending mode for the saturated background and active shadows.

Of course, we don't see a bright solid background, but we don't need to, because the background needs to be tinted only slightly - made a little different from white.
The basis of the second screen is ready, now we finalize the details.
3.8 Correcting the timing of the composition
Double-click on the human layer, go to the video workspace on the timeline and move the timestamp to the segment with the desired rotation phase. Then click the opening bracket next to the field showing the timing of the initial video frame, it will be trimmed and automatically corrected in the Timeline panel.

Once you've dealt with the individual layer, trim the entire composition. In the Timeline panel, move the slider to the fifth frame of the eleventh second and choose Trim Comp to Work Area as shown below. The composition is now 11 seconds long.

As a result of all the previous actions, we will have two completed and ready for further work compositions.
3.9 Creating text layers
Now we need to add the actors' names to the Mask composition. Select Text from the Text toolbar and create four text layers with the names, just like we did in the previous composition. It should look like this:

The text settings are the same as in the Forest composition, but this time we will use a font size of 37 px.
The second screen is complete. Now let's animate the text a bit and think about how it will interact with the video. For example, you could make it so that when you go to this screen, the text at the top right is immediately visible, and the left side of the caption appears as if from underneath a moving person.
Go to the Layers panel, select all the text layers and then move them to the bottom.

3.10. Animating text with the Wiggler effect
Let's create an interesting camera shake effect - for this purpose, there is a special tool "Wiggler" in After Effects, it is located in the same place as the Effects & Presets panel.

If the Wiggler panel is not there, go to the menu and select Window → Wiggler ("Window" → "Camera Shake").

We will use the minimum values so that the effect does not create an unnecessary shimmer in the frame. The text trembling should be applied at the whole time interval of the composition. To apply the effect, you should use the keyframes of the Position property of the text layer.
Select both text layers, Michelle and Monaghan, and press the P key to expand the Position property for each of them. In the first and last seconds of the composition, set the keyframes.

Select these frames in the Timeline panel for the Michelle layer, as shown below.

Working with each layer, the effect must be created as a new one.
Go to the Wiggler effect and specify the following parameters:

Press the spacebar and see what happens. The effect is noticeable, there is a slight movement of the text - just what you need.

For the rest of the text in the Mask composition, apply the effect yourself using the same algorithm:
-
● select the text layer;
-
● Press P to select the Position property;
-
● set keyframes at the desired interval;
-
● highlight these frames;
-
● go to the Wiggler panel;
-
● specify the values and click Apply to use the effect.
The result of your work should look something like this:

3.11. Animating text transparency
Now we need to figure out what happens to the text after the person passes: now the caption hangs in the air, there's no plot, and it looks a bit empty and incomprehensible. To make the composition look complete, we use the "Opacity" layer property to make the text disappear.
Select both text layers, Michelle and Monaghan, and press the T key to expand the transparency properties.

Move the timeline marker in the Timeline panel to the beginning at 0 seconds and create keyframes.

In the same way, create keyframes at 3 and 5 seconds, and at 8 seconds change the Opacity value to 0.

The text comes in behind the person but doesn't appear on the other side.

Do the same with the Michael and Potts layers (you can experiment and make the appearance also transparent). The final result of changing the Opacity property:

The main work on the compositions is completed, but there is a little nuance left.
The Forest composition overlaps part of the Mask composition. To make the transition, go back to the Title composition and move the timing of the Mask layer in the Timeline to the right so that it starts immediately after the end of the Forest composition.

Let's see how the junction of the compositions is worked out.

Rather sharply. To soften the appearance of the second composition, create an additional adjustment layer.
Step 4. Creating a transition layer
4.1 Creating an adjustment layer
Right-click in the Layers panel and choose New → Adjustment Layer from the context menu.
Reduce the timing of the layer in the Timeline panel to about six frames. Slide it to the edge of the end of the first composition, as shown in the screenshot.

4.2 Adding the Glow effect
For the transition layer, add the Glow effect by selecting it in the Effects panel. Specify the following values:

Especially important is the Glow Threshold, which is the property we will animate.
4.3 Animating the transition effect
In the effect properties of the adjustment layer, choose Effects → Glow → Glow Threshold and create two keyframes for this property - one at the beginning of the adjustment layer timing and one at the end. The value is 0%.
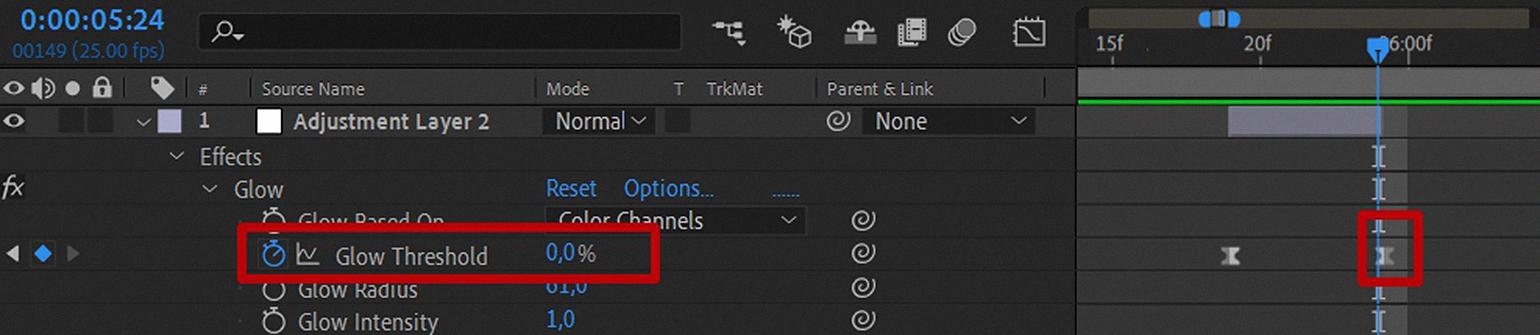
Select both frames, right-click on either of them and choose Keyframe Assistant → Easy Ease from the context menu, or press F9 to soften the transition animation.
4.4 Testing the animation
Let's see what will happen.

Just what we need! Now let's make a smooth transition between the second composition and the first.
Copy the layer by pressing Ctrl + D.

Then move the layer to the end of the playback and use the timeline marker to trim off the excess, as shown in the screenshot:

The timing of the video is 15 seconds - pretty good.
Check again.

Step 5: Adding dust and scratches
5.1 Adding a Footage
Find footage with scratches or moving dust particles. For example, this one:

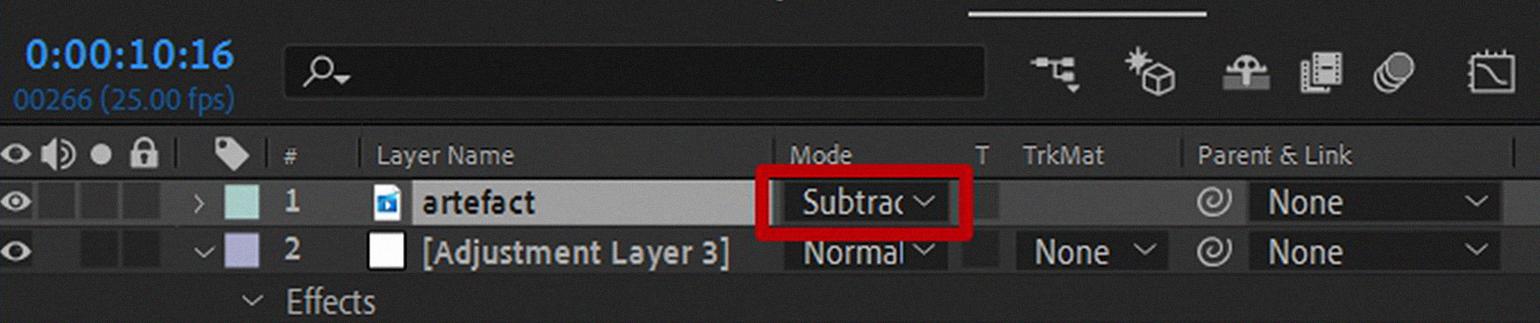
Transfer this footage to the Source folder, rename it, and add it to the Title layer stack of the main composition.
Change the blending mode to Subtract:
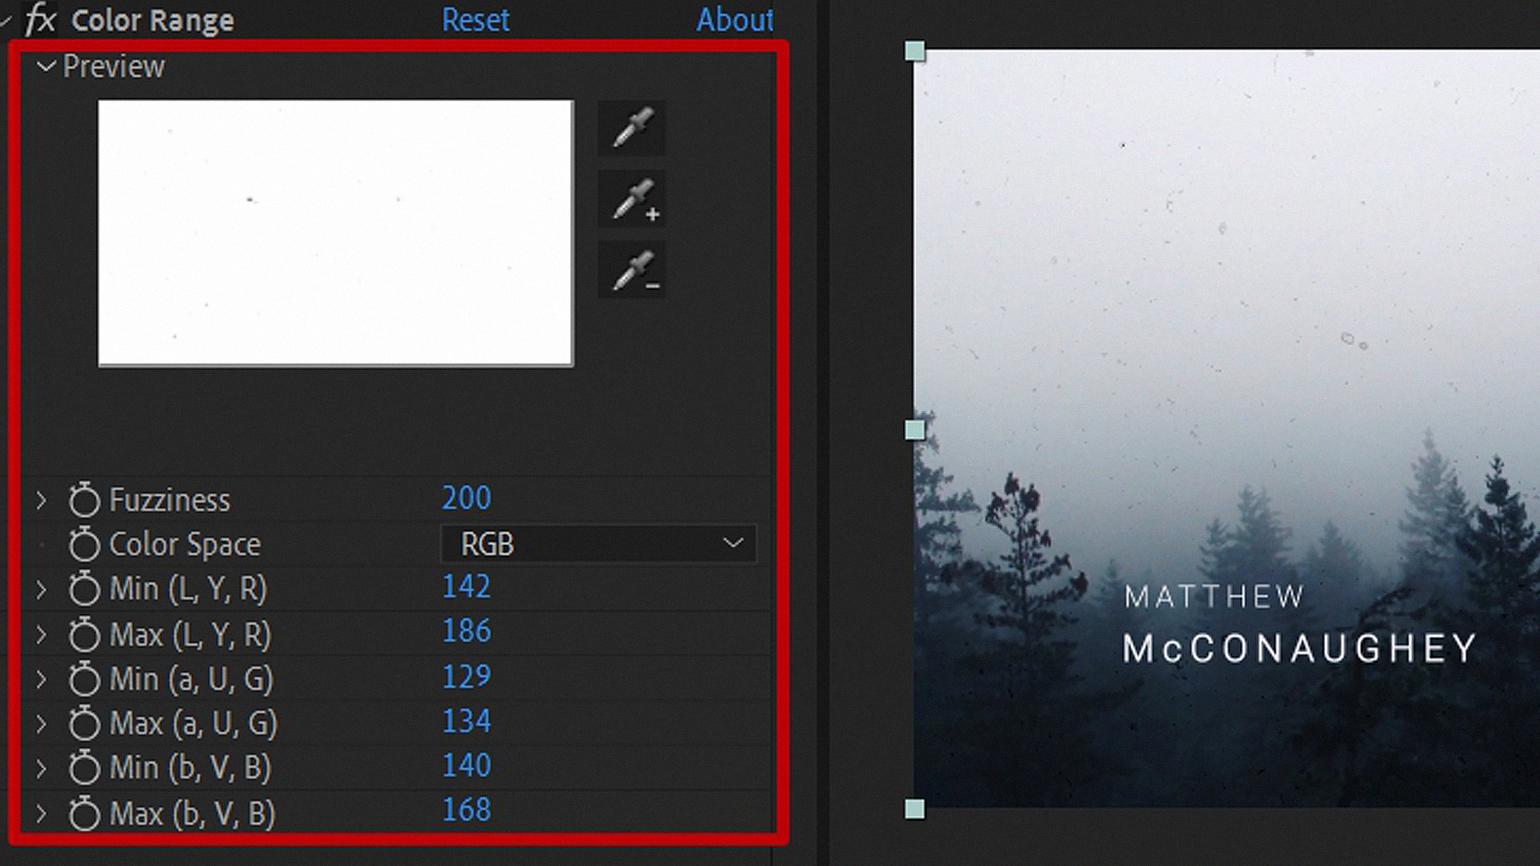
5.2 Applying the effect
Add a Color Range effect with the following parameters:
5.3 Testing the result
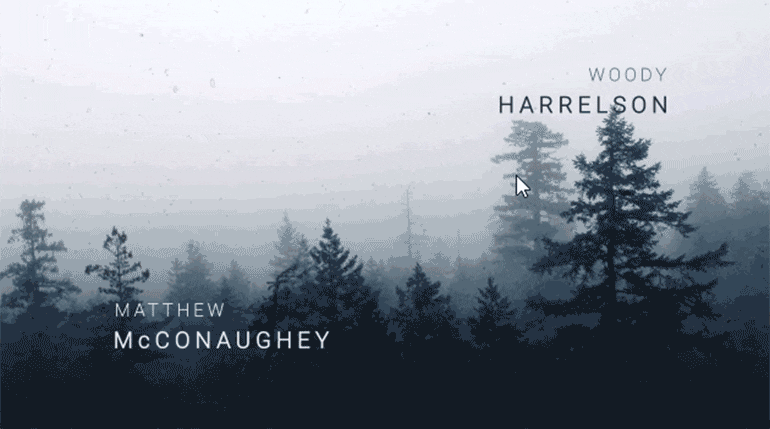
The atmosphere is just right! We look at the work with a critical eye - if everything suits us, we put it on our YouTube!
Done!
Summary of work