
How to sync your audio to your video in Adobe Premiere Pro
Creating video content is an extremely interesting activity that allows you not only to have fun but also to create attractive content that you can use to promote your products or services.
As of 2020, it is video content that is the most attractive and profitable investment in terms of content marketing. Indeed, people interact better and more willingly with video content. This is a much better connection than between a person and a picture or, even more so, a text.
But while video content creation is hugely popular, it is still a tough task that needs to be taken seriously.
Luckily, there are a large number of different tools out there these days to help entrepreneurs and marketers create video content. You no longer need to contact directors, editors, and musicians, whose services are very expensive.
You can find music on sites like Taketones.com, which provide their users with huge libraries of royalty-free music.
Tools like Adobe Premiere Pro 3 will help you with editing and effects.
However, in today's article, we will not delve into this topic too deeply. We want to move on to the next step and tell you how to solve the problem of audio and video synchronization in Adobe Premiere Pro 3.
The problem itself
The problem itself appears when you are trying to make quality video content. Agree, you can record sound on the microphones that are installed in the cameras you shoot with, and the synchronization problem won't even appear.
However, professionals know that sound quality is very important. And the quality of the audio track recorded on the microphone in the camera is often much worse than the audio recorded on a special microphone. It is in attempts to make the top video content, voice, or any other audio recorded on a separate microphone and then synchronized with the picture using Adobe Premiere Pro 3.
It is very easy to verify this. From the main control panel of Premiere Pro Three, double click on your video in the Projects panel and play it back from the Source panel. What you will hear will be the sound recorded on the microphone in the camera. You will immediately understand what a terrible quality it is. For comparison, double-click on an audio track recorded with a separate microphone. The difference will be huge.
There are several ways to synchronize the audio from the microphone and the video track. We will tell you about them.
The first way

The first method is the fastest and allows you to achieve the desired result in just a few clicks.
In the project panel, select the audio track and video track that you want to sync. After that, right-click on one of them, and select the Merge Clips option. In the menu that opens, you will see merge options such as In Points, Out Points, Timecode, and others. You are interested in the Audio graph - make sure the circle next to it is filled and not empty.
After that, click OK and wait for the result. The merging speed depends on the size of the tracks. As a result, you will get a new Merged file in your project panel. Make sure the merge was successful by double-clicking on the new file. In the Source panel, you should see your video, with the audio track recorded on the microphone. There shouldn't be any resynchronization.
The second way
The second method is more manual and suitable for those who are used to doing everything with their own hands.
Drag the audio track to the new sequence panel. Do the same for the video track. Next, try to make them similar in size and sound wavelength. There is no need for precision, you can do it approximately by eye.
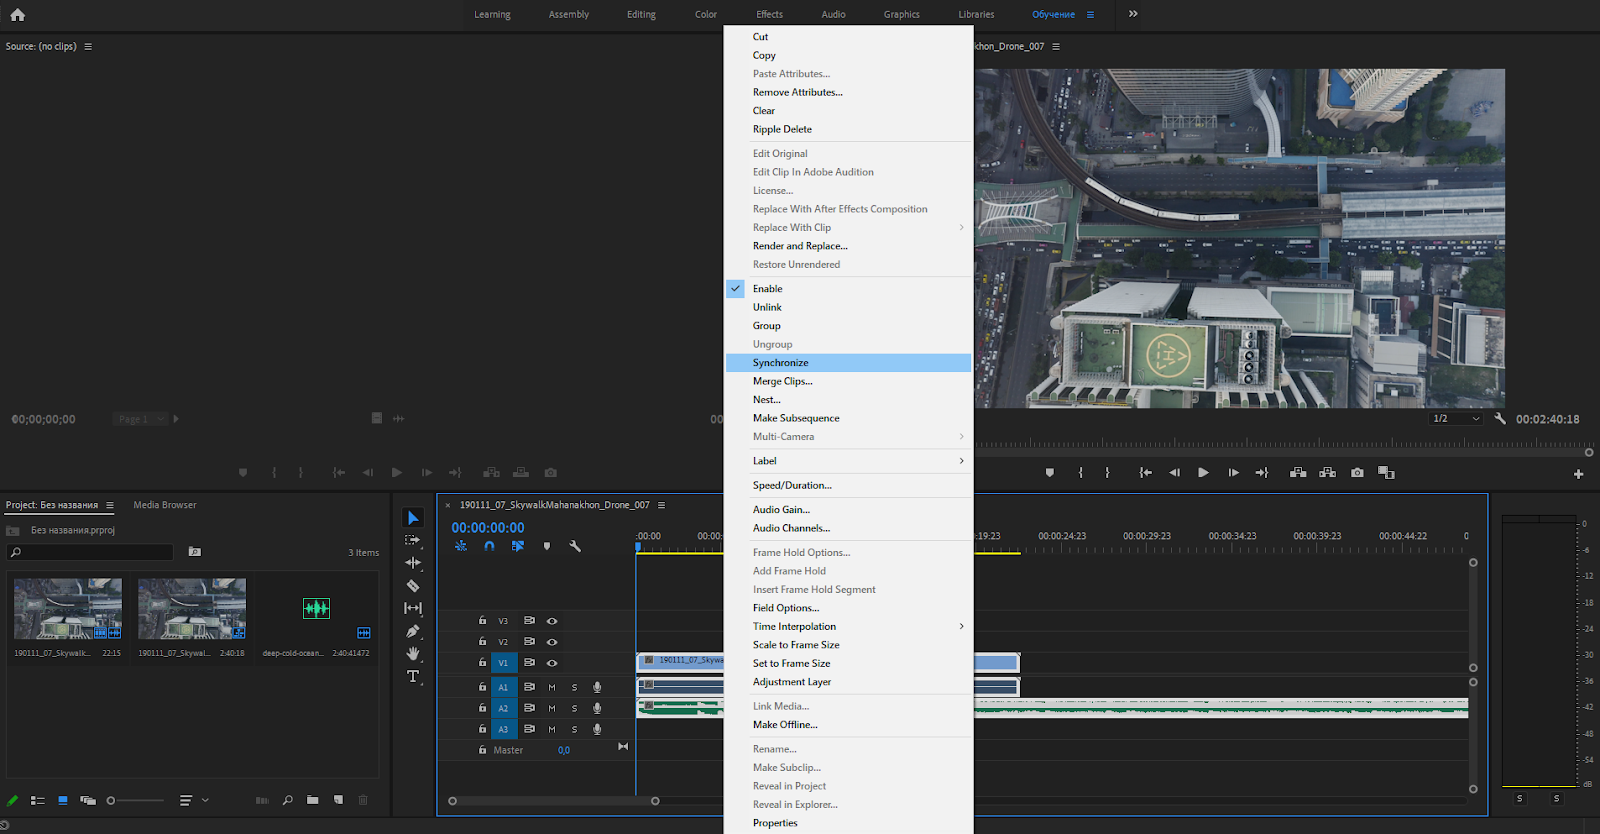
After that, select both paths (you can circle with the mouse) and right-click on them. In the menu that appears, select the Sync option. You will see the same menu as in the previous case. Make sure again that the circle is filled in the audio column and click OK.
Again, you need to wait until the process is complete. After that, you can play both tracks at the same time and hear that they are in sync.
Conclusion

As you can see, the sync issue does not cause any problems if you know what to do. Adobe Premiere Pro 3 allows you to achieve the desired result in just a few clicks. And if your video and audio are about 3-4 minutes long, then you will get the result within a few seconds. Of course, longer files will take longer to sync.
There is another way to sync tracks, the most manual of all. In it you do everything with your hands, bring the waveforms of the audio track and video track as close as possible, and manually expose them so that they are perfectly similar to each other. This is the longest method, the need for which may arise only if the previous two methods could not achieve the most accurate synchronization. But this happens very rarely, and therefore we did not dwell on this method in detail.