As soon as you start working in the program, it automatically creates a project with the name Untitled Project. You need to save the project under a new name by pressing File->Save as or press the key combination.

The window will appear where you can select a folder on your computer hard drive where the project file will be saved or create a new folder named, for example, "After Effects Projects" and save all projects in this folder and you will not have to look for them all over your hard drive every time. Once the folder is selected, enter the name in the "Filename" field and click "Save".
Any project in After Effects consists of one or more compositions that can be rendered into a video file at any time. A composition can consist of numerous audio file formats, video files, images, other compositions, or Adobe Premiere editing program project files.
A composition can be created in a variety of ways. Let's start with the most basic one. Run the Composition->New Composition menu command. Note the keyboard equivalent of this command. This will open a window with the parameters of the new composition.

The first thing you are prompted to do is enter a name for the new song. It is desirable to assign names to projects, compositions and layers so that in the future you could easily understand which project or composition to open, and not guess "which file you need img12 or img16? In projects with many songs, it's easy to get confused! Enter a song name such as "my first song". But do not press the key. In this case, the window with the song parameters will close.
If you didn't manage to do this, don't worry. Execute Composition->Composition Settings (Ctrl+K), and the window with the composition parameters is in front of you again. You can change the composition parameters at any moment of work on the project before it is rendered.
Next, we set the parameters that directly affect the appearance of the composition. To do this step, we can select one of the templates in the Presets drop-down list. Let's stop at Pal D1/DV Square Pixel.

Here you can find templates for a variety of purposes: posting videos on the Internet, TV systems, and even wide-screen cinemas. The template defines Width, Height, Pixel Aspect Ratio (square or rectangular), and Frame Rate. All these parameters can be entered manually, with the Custom template selected. And you can save the template under a new name using the buttons next to the Preset field.
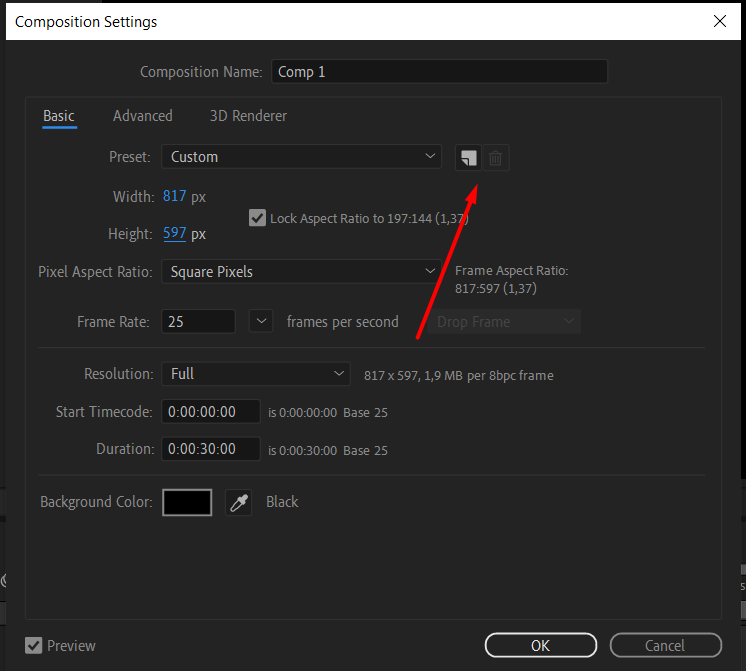
Consider the remaining three options. The resolution sets the resolution of the composition for display in the Composition panel. Later, when rendering the composition, you will be able to set the resolution again in the rendering settings or leave it at the current value assigned in the composition's settings. It is worth noting that the lower resolution you choose, the faster the preview of the song will be played, but of course, there will be a loss of display quality.
The next parameter, Start Timecode, sets the timecode value of the first frame of the composition. If you set it to, for example, 0:00:01:15, the first frame of all the layers of the composition will be assigned this value.
And the last parameter is Duration; it sets the duration of the song.

It's time to write a few words about setting a time value. Of course, you can enter all the commas and colons, but you don't have to do that. The program provides for automatic conversion of the entered number to the time code, set in the project parameters. For example, if you enter a number 312 in any area of the timecode (for example, the value of the song duration), the value will be converted to 0:00:03:12.
If you enter a two-digit number greater than the number of frames specified in the composition settings, for example, 70, it will also be converted into 2 seconds and 20 frames at a frame rate of 25 per second. Try entering the number 370 now. The number 70 will be converted into 2:20, but we also have a number 3, it will be added to the 2 seconds obtained by recalculating the number 70. The result is 5:20.
Now let's turn to the project settings, where you can set how the timecode is displayed. Run the command File->Project Settings (Ctrl+Alt+Shift+K). A window will appear displaying the project parameters.

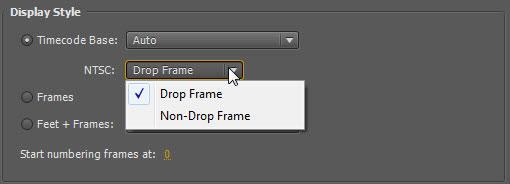
In the Display Style settings group, you set the format in which the duration of the song is displayed. Timecode Base: time will be displayed as <hours:minutes:seconds:frames>. By selecting this format, you can also specify the maximum number of frames per second in the displayed code. That is the first number on the right in the time code, reaching the selected value will be zeroed.
By selecting Auto, the frame rate value set in the composition settings will be used, so this item is preferable. You have already noticed that some obscure parameter comes next. You can select two values from the NTSC drop-down list: Drop Frame and Non-Drop Frame. Let's see what's going on here. When we use NTSC patterns, we will have a discrepancy between the time and the number of frames played back. This is because the format displays 29.97 frames per second, but not 30. As a consequence, the time will run out a little faster.
If the duration of the composition is short, the discrepancy won't be noticeable, but if you work with a composition that is longer than half an hour, this defect will become noticeable. If you need an accurate display of the time code during working with the NTSC standard, select Drop Frame here. This option will compensate for recalculation errors.
The next style of displaying the duration of a song is Frames. Counting is done simply by numbering the frames. And the last style is Feet+Frames. The duration will be counted in feet. For 35mm it is counted as 16 frames per foot, and for 16mm it is 40 frames per foot. You can use this style if you are working with a film, but for the rest, it is better to use one of the previous ones.
For the Frames and Feet+Frames styles, you can specify the value of the first frame in the Start Numbering Frames at the field.
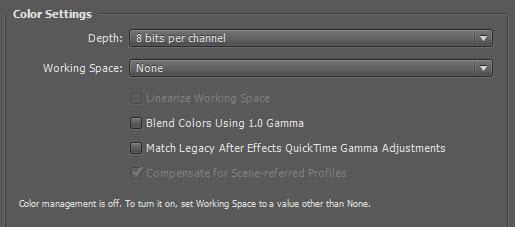
The next block of settings sets the color depth and color space parameters. There is no point in going into these details at this stage. Let's leave everything as it is here.
And the last thing we can change in the project settings is the frequency of sound descreening. The higher it is, the higher the quality of the sound will be. But as the quality increases, so does the size that will subsequently occupy the rendered video file.

You can change the composition and project parameters at any time you work on the project. When choosing templates for the composition, you should consider the parameters of the source files so that the program doesn't have to do extra work during the preview.