
I often hear the statement from my fellow editors: the cut is the best transition. This is true in most cases. Just recall the extinguished match and the sunset in the desert in Lawrence of Arabia. This is genius.
But now transitions in movies are already an integral means of expression, without which the film will become impoverished and will not be able to fully express the author's intention.
Four Rooms "The Missing Ingredient" novella by and Alison Anders, "Sherlock" series, Edgar Wright's movies (you may be able to continue this list) clearly demonstrate my thesis above - the transition can be an important part of the story.
Gordon Parks' original movie starring Richard Roundtree was released in the early 70s. In the sequel of Shaft (2000) by John Singleton (with Samuel Jackson, Christian Bale, and yes — legendary Richard Roundtree) — expressive transitions help to convey a sense of the era of the original movie.
The transitions in Singleton's movie are important, along with the main music theme by Isaac Hayes. Each chapter of the sequel ends with expressive animation, in the style of the 70s when the fabric of the subsequent plot pierces the previous one, cuts, and absorbs the past. I have compiled all the transitions from Shaft 2000 into one clip for you to appreciate:
The next time I watched this movie, having already studied enough Apple Motion, the thought struck me: this transition can be done in Motion and then applied in FCP. It is enough to know how the Replicator is created and animated, the Image Mask works. We also need a rig and Pop-Up menu widget for the transition to be in at least two design options.
First, let's select one of the transitions that we will recreate in Motion. Let's study it carefully. To accurately reproduce the animation, we need to refine the timing and design details.
In the Project Browser, select the type of blank project — Final Cut Transition. I measured the timing of the animation in the reference. It lasts 40 frames. Let's set the same value.
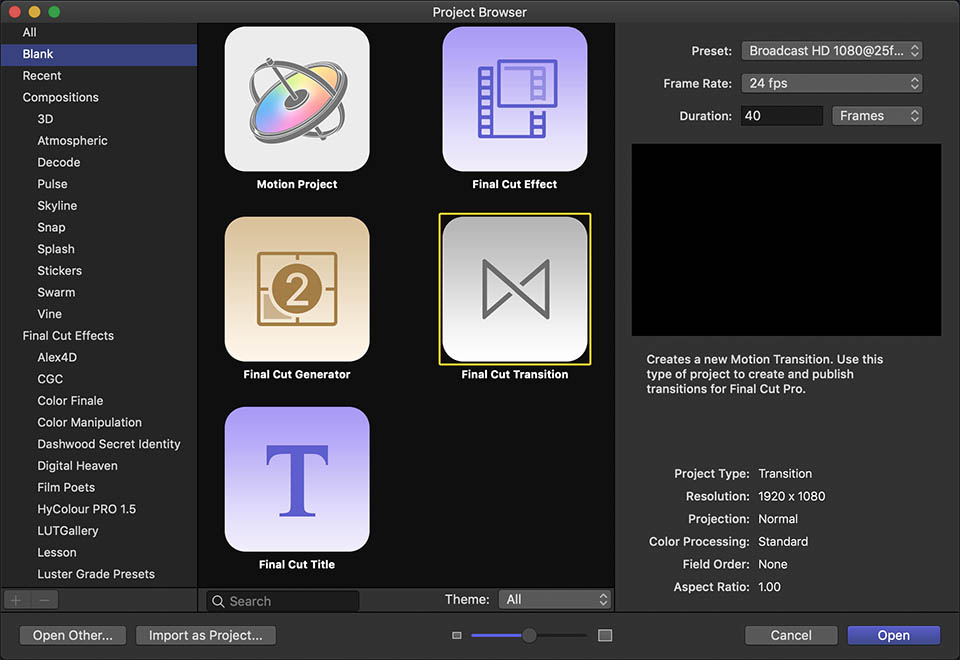
Unlike Title Template - Transition Template by default contains a group with two placeholders that represent FCP timeline clips - Transition A, which will be to the left of the transition, and Transition B, which will be to the right of the transition. By default, this cut transition. Anything we do with placeholders in Motion will be reflected in the corresponding clips in the FCP timeline.
And just like Title Template - Transition can be used immediately after creation. Even if we do not take any action with placeholders - Transition, immediately after saving, will act as an audio-only transition.
Let's save our project right away, select (or create) a category and a project name.
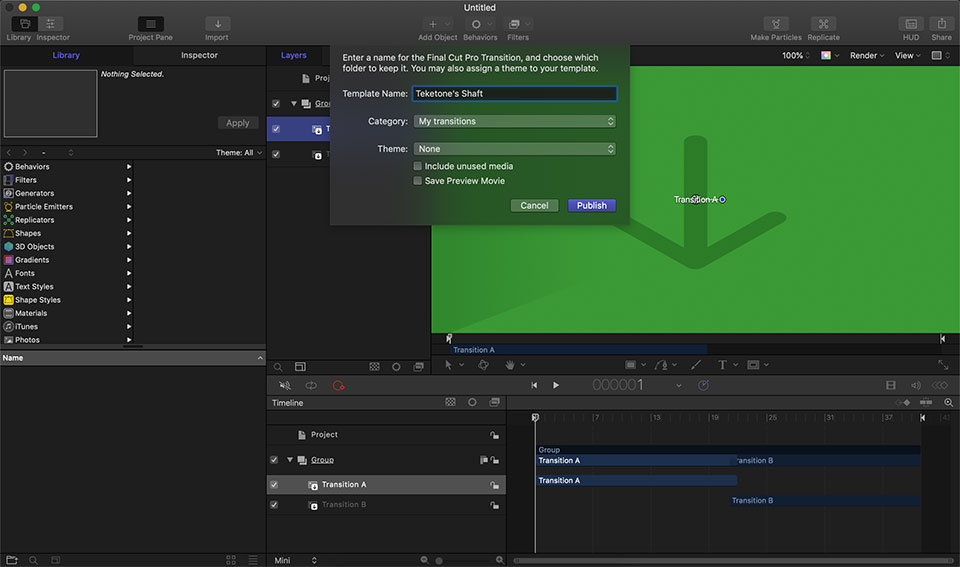
The main effect for the transition will be the Image Mask, with the replicator as the source. Therefore, let's immediately extend Transition A to the end of the project, Transition B starting from the first frames of the project.
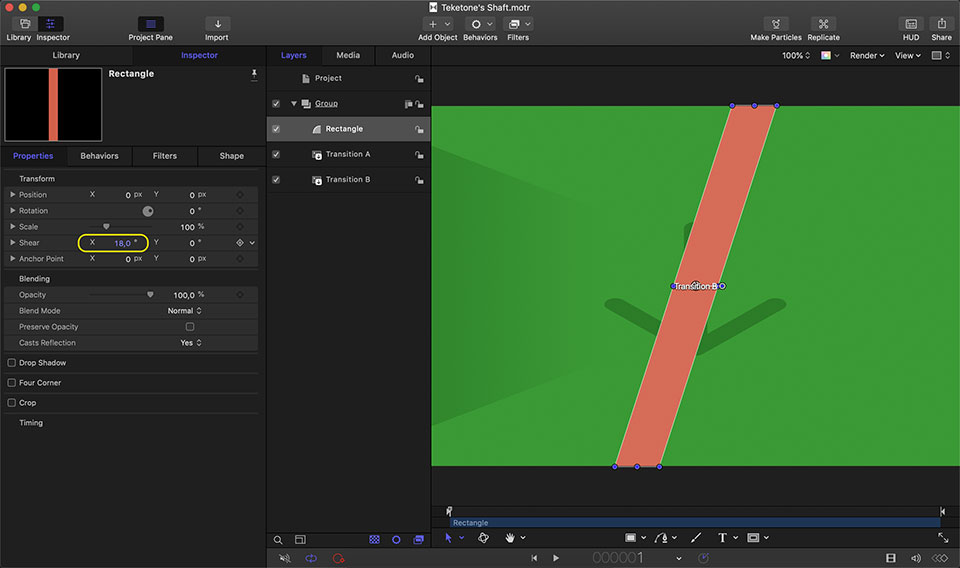
Let's create the Replicator, a solid alpha channel, which will consist of animated diagonal lines. In total, we need 14 lines, as in our reference.
The source for the replicator will be a Rectangle shape, with a height of 1080 px and an approximate width, the exact value of which we will find out in the process of creating the replicator.
After creating a rectangle with the Rectangle Shape tool and adjusting the size of its height - be sure to return the Inspector/Properties/Position parameters to their default values. This should be done almost always when we create a replicator source. Make the shape with a contrasting color to Transition A
Now we will create a diagonal from the vertical line. Based on the reference, change the Inspector/Properties/Shear X value to 18º
The source for the replicator is almost done, we will toon it in the process of working with the replicator, but the replicator itself can be created. Make sure the Rectangle is selected and press L or click on the corresponding button of the Main Toolbar or use the Menu/Object/Replicate command.

The replicator source (Rectangle layer) is deactivated, a Replicator layer has appeared, which consists of the Replicator itself and the Cell. By default, the replicator is created in the shape of a rectangle, with the size of 300х300 px and 25 copies of the source, organized in 5 rows and 5 columns.
If the Replicator contains only one Cell — when the Replicator is selected in the Object tab, the settings of both the Replicator and its Cell are available.
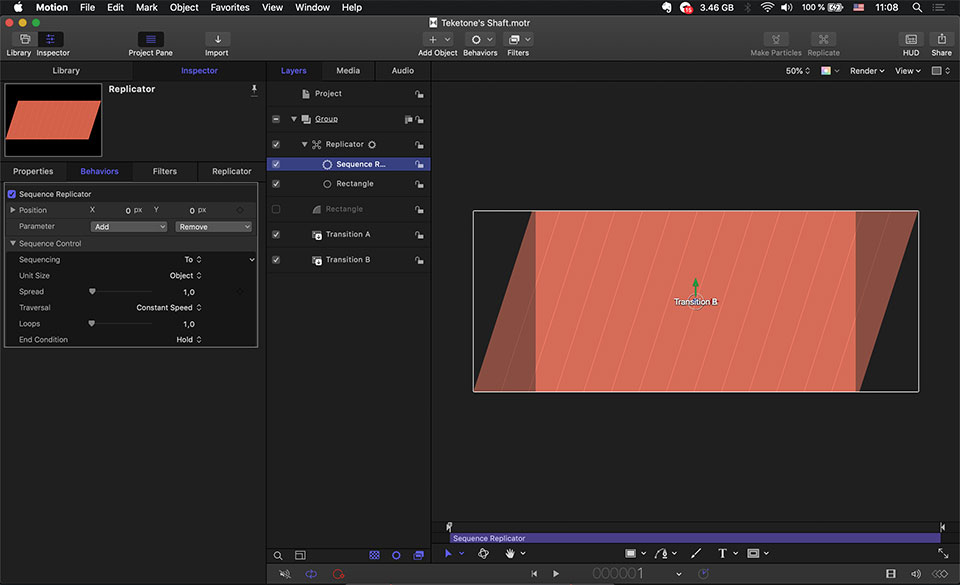
In the Replicator's Object tab, change the Replicator Controls/Shape option from Rectangle to Line.
Change the appeared value of Replicator Controls/Start Point and Replicator Controls/End Point so that the outermost cells of the replicator completely overlap the upper left and lower right corners of the Canvas, creating the placeholder. For convenience, enable Show Full View Area option (⇧V) and scale the Canvas to see the entire Replicator.
Increase the Replicator Controls/Points value to 14.
You may need to change the Width of the Replicator source so that the Replicator fills the Canvas completely, with no gaps. For the most precise control of this, temporarily set the Additive Blend checkbox in Cell Controls.
The Image Mask source is now ready to animate. Lines must slide diagonally from behind the screen, changing their width as well. In this case, the position animation ends earlier than the animation of the width of each line. Therefore, we will use two Sequence Replicator behaviors by splitting the Position and Scale animation between these behaviors.
Let's start with Position. After making sure that the Replicator is selected, from the main Toolbar (or Library), apply the Sequence Replicator behavior. In the Behaviors Inspector, add the Position parameter. If you have overlays activated, you will immediately see the 3D gizmo on the canvas. Also, the Select Transform tool will automatically change to Adjust Items.
In the Sequence Replicator behavior, change the Sequence Control/Sequencing option to From
Set the Position Y value to 1082 (two pixels for safety net).
Place the playhead approximately in the middle of the project and drag the red gizmo arrow to the right, so that the lines slide strictly in the 18º diagonal direction. Set the Spread value to 4.
Rename Sequence Replicator to Sequence Position.
Duplicate the behavior. Rename Sequence Position Copy to Sequence Scale.
In the Sequence Scale Behavior inspector, remove the parameter Position and add Scale. Expand the Scale triangle to change only the X value. Let it be 50%.
Reduce the duration of the Sequence Position by about one quarter and play the project. Compare with the reference. In my opinion, it turns out very similar. Turn off the Show Full View Area option (⇧V) and uncheck the Additive Blend checkbox in the Replicator Cell tab.
The source for the Image Mask is ready. The animated replicator creates a solid alpha channel and erases Transition A, revealing Transition B, which is a layer below.
Apply an Image Mask effect to Transition A layer. This is conveniently done with a context menu. Without deselecting the Image Mask, drag the Replicator from the Layers list to the source window in the Image Mask Inspector Object Tab or on the Image Mask HUD.
Change Mask Blend Mode from Add to Subtract.
The transition is essentially done. Running FCP, we will find it in the Transitions Browser, in the category, and under the name that we specified when saving.
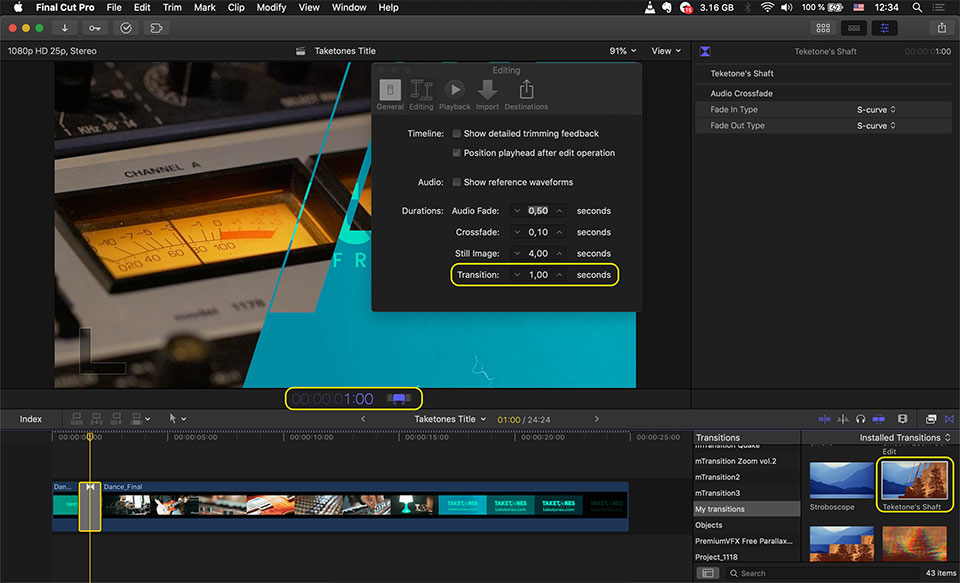
Having applied the Transition in FCP, you can notice that in timing it is somewhat shorter than the Motion project. The reason is the default transition duration, which is set in the FCP Preferences.
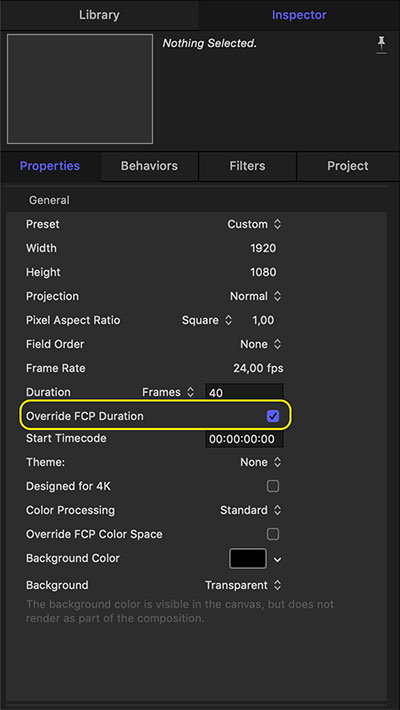
To fix this situation - in Motion, in the project inspector check the Override FCP Duration checkbox.
Back in FCP and reapplying the transition, you can verify that it now lasts the same as the Motion project - 40 frames.
The Transition Template is available here.
We just need to add design and animation options to our already created transition. For this, we need a rig and Pop-Up widget. I will tell you exactly how to do this in the next part.
Stay tuned.